About MissCakeBaker

I spend the week running in heels and the weekends in my apron.

Sunday, 25 September 2011

Chocolate Malteser Cake - Happy Birthday We Should Cocoa!


To celebrate the 1st Birthday of the We Should Cocoa bloggers challenge Chele at Chocolate Teapot challenged us to create a chocolate masterpiece to bring to the virtual party. I've been wanting to try a chocolate Malteser cake for ages and the girls in my office all asked demanded that I make this one after they spotted it in Woman and Home magazine. And, after all, it's a 1st birthday and let's face it such an occasion demands a chocolate cake of some description. I like the fact it requires buying a jar of Horlicks, thus necessitating me to have a cup at night without feeling too old before my time! I have to say that the plastic jars just aren't as nice as the old glass ones though. Talking of days gone by does anyone else remember Horlicks Tablets which I used to buy at Boots and eat as sweets?


So the cake - the Horlicks in the frosting definitely gives it a lovely Malteser taste - slightly salty against the sweet.  I didn't add the egg to the frosting as per the recipe as I'd run out. The cake itself is quite dense - I think it could have been slightly more chocolately.  The dense mixture also caused my poor Kenwood handmixer to go into a smoking meltdown. Who knew the flames inside would cause the plastic to actually glow yellow?! Needless to say it is has been consigned to the bin.  I was wondering what it would be like with the odd actual Maltester dotted in the batter rather than adding the Horlicks to the actual mixture?  All in all though it pretty much fits the bill and on that note - Happy 1st Birthday We Should Cocoa!


The Recipe


300g butter
300g light muscovado sugar (I ran out so used a mixture of light and dark)
5 eggs
225g self-raising flour
75g cocoa powder
3 tbspn Horlicks
200ml milk


Frosting


100g butter
125g dark chocolate (70%)
50g Horlicks
350g icing sugar
4 tbspns milk


1. Preheat the oven to 180c, gas mark 4.  Butter 2 x 20cm sandwich tins. 
2. Beat the butter and sugar together until light and fluffy, then gradually beat in the eggs one by one.  Then add the flour, cocoa, Horlicks and milk.  Divide between the sandwich tins. Bake for around 45 mins or until an inserted skewer comes out clean.
3.  Leave the cakes to cool for about 10 mins in the tin before turning out onto a wire rack.
4. To make the frosting melt the butter, chocolate and Horlicks together in the microwave (the melted mixture has a slightly gritty texture due to the Horlicks).  Then beat in the icing sugar and milk.
5.  Assemble the cake using half the frosting for the middle and the remainder for the top of the cake. Decorate with maltesers. 

Sunday, 18 September 2011

Chocolate & Raspberry Cheesecake Brownies - A Random Recipe


When it came to my blog I got all out of kilter in July and August due to some lovely weekends away and a long holiday.   September has been a bit like going back to school for me and the routine has returned.  With that return to more normal weekends has been the chance to see what blogging challenges September has brought.  Dom over at Belleau 'spanking brand new' Kitchen (and very nice it is too!) set us the task this month of sifting through any saved recipe cuttings and picking one to make for his Random Recipe Challenge.  I love this idea - I am a serial magazine recipe snipper.  As a consequence I have recipes shoved in the front of books, in the magazine rack and in my 'to do' pile, all waiting to be tried out. If they make the grade they then get written or stuck in my actual recipe folder.  It wasn't hard to randomly select one and this ridiculously rich brownie recipe was the one I found. I think it is from an old copy of Sunday Times Style which was featuring recipes from the Green & Black's cookbook but I'm not 100% sure as I don't have the full article. I've been meaning to make this brownie recipe for ages, mainly because it looked so sinful on the picture. It is very puddingy in the respect I think it would be better eaten as dessert rather than with a cup of tea.  It tastes as decadent as it looks.  A little goes a very long way (probably on the hips too....).

The Recipe

For the brownie:
280g unsalted butter (yes more than one block of butter, sinful I told you)
170g dark chocolate (70% cocoa at least)
350g golden caster sugar (sinful again)
70g plain flour
pinch of salt
5 eggs
2 tspn vanilla extract
100g white chocolate, broken into small pieces

For the cheesecake:
350g cream cheese (I used 300g as that's what size the large tubs come in)
75g golden caster sugar
1 tsp vanilla extract
2 eggs
170g fresh raspberries (I used one punnet)

1. Heat the oven to 180c/gas mark 4.  Grease and line a 20cm square tin.
2.  Make the brownie mixture by melting the butter and chocolate (microwave is fine and easy).  Remove from heat and set aside to cool. Combine the sugar, flour and salt in a large mixing bowl, pour over the cooled chocolate and mix until smooth. Beat the eggs separately before adding to the mixing bowl along with the vanilla extract and the while chocolate.  Blend together until the mixture is shiny.  Pour into the prepared tin.
3.  Make the cheesecake mixture by whisking the cream cheese, sugar, vanilla extract and eggs until smooth and creamy.  Pour this over the brownie mix, trying to create an even layer.  Drop the raspberries into the tray.  Use a fork to swirl the mixture for a marbled effect.  
4. Bake for about 45 mins. The brownies should be set but still wobbly.  Leave to cool.

Sunday, 11 September 2011

Avon Crusade Baking Set


Ding dong, the Avon lady's calling..... with your baking set.  Maybe not quite what you'd expect to hear from Avon but the good folk at this beauty giant have created the above set in the aim of getting people to bake in aid of breast cancer. The Avon Crusade Baking Set, which retails at £5, includes a Crusade ribbon cuttter, a heartshaped cutter and 6 silicon cupcake holders.  £1.25 of this amount is donated to Breakthrough Breast Cancer and the remaining proceeds go to not-for-profit projects.  Avon is hoping that those buying the set will host bake sales in aid of the breast cancer cause.


Avon kindly sent me a set to try out and write about. I'm firstly very happy to do this as I think it is a very worthwhile and fun way of raising money for such an important cause.  Secondly, I used the silicone cupcake holders to make the below Victoria Sponge cupcakes and they were great and gave perfect little cup cakes.  The sets are available from your local Avon representative or online at avonshop.co.uk.  


I made the above cupcakes using a classic cupcake sponge and buttercream topping. With these ones however I scooped a little sponge from the middle of the cupcake and filled it with strawberry jam before replacing the lid and adding the topping. It's my take on a cupcake version of a Victoria sponge.

Sunday, 4 September 2011

Wholemeal Walnut & Seed Bread


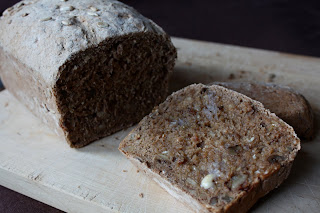
I'm a complete novice when it comes to 'proper' bread making.  My first attempt involved making a Doris Grant Loaf which turned out fine but it didn't make the aforementioned 'proper' level as it doesn't involve kneading. As I was thinking about what to bake this morning I thought it was about high time I actually graduated up to this next level. Walnut bread is one of my favourites so when I came across this recipe on BBC Good Food I decided this was the one to try. I'm pleased to say that it has turned out well despite a slightly anaemic looking crust (all advice welcome!).  We just had it for dinner with some delicious Spicy Chicken & Puy Lentil broth that Mr CB made.  It is quite dense but was so good eaten warm from the oven with lots of butter.


The Recipe


500g strong wholemeal flour
7g sachet fast-action dried yeast
1 tsp salt
around 350ml warm water
mixed seeds (eg pumpkin & sunflower or whatever you fancy)
50g walnut pieces


1. Place the flour, yeast and salt in a large bowl and mix together then make a well in the centre. Gradually add the water mixing it together until is forms a slightly wet dough. Use as much water as needed, which may not be the full 350ml. Tip the dough onto a floured surface and knead, while also adding the walnuts and seeds,  for around 10 minutes until it is smooth and elastic. Place the dough in a clean oiled bowl, cover with cling film and leave to rise until doubled in size. 
2.  Heat oven to 220c/gas 7.  Knock back the dough and then form into an oval, roll round in some more seeds, and place in a lighted oiled loaf tin. Cover with a tea towel and leave to rise for around 30 mins.  Bake the bread for 15 mins, then reduce the heat to 190c/gas 5 and continue to bake for 30 mins until the loaf sounds hollow when tapped on the base. Leave to cool on a wire rack before eating (if you can!).